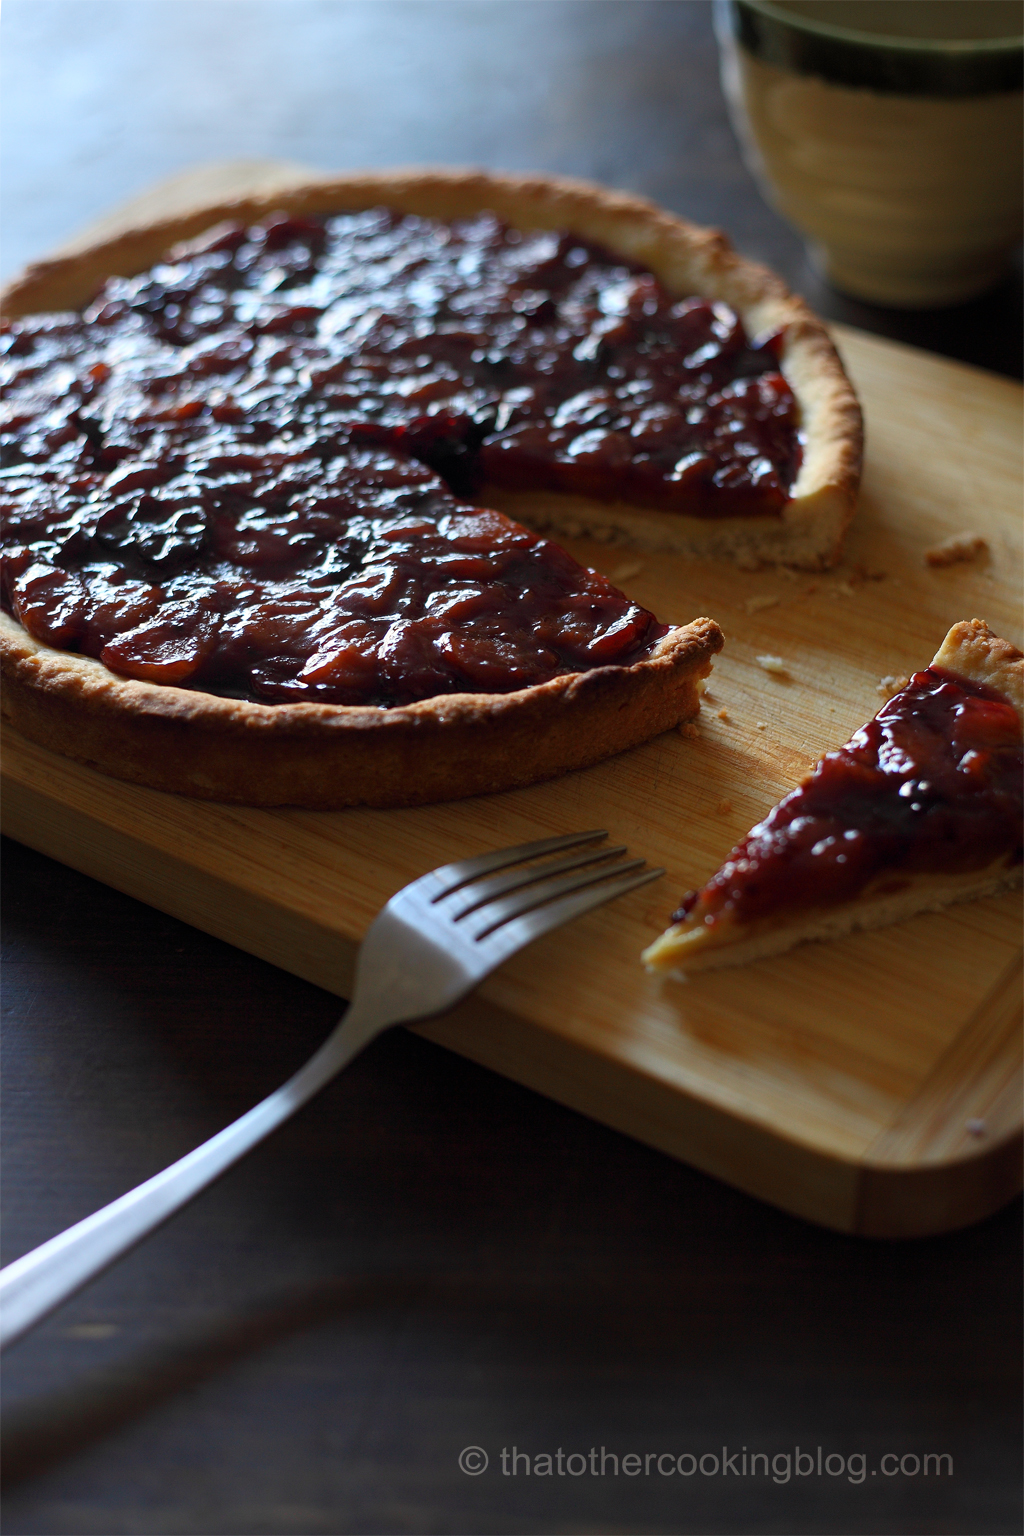
For the trained eye, those adept at baking and pastry making (hopefully not, because I need some encouragement here but I’m ready and could use some constructive criticism), this tart will show some basic execution flaws, like the walls aren’t thin enough or tall enough, and the filling doesn’t reach the edge of the crust uniformly, but I gotta start somewhere. I still wanted to post it because it tasted really delicious and it is a step in the right direction I hope.
My first tart tatin for example, yes, you guessed it, in the trash can.
That didn’t stop me, oh no. After that incredible tart tatin disaster a few weeks ago, I decided I would try a simpler tart. A basic apple tart. Which would involve blind baking so I could practice that skill as well. The fruit is cooked separately and then added over a layer of silky pastry cream, all of this goodness over a crumbly pre cooked tart crust.
I used a small amount of black currant preserve that I had bought at a store a while ago which had been waiting patiently in my fridge to find a purpose in life. I figured since I didn’t have enough apple filling, I’d combine it with it. Greatest thing that ever happened to this tart.

On blind baking:
Baking tarts and their fillings together is great, I love things that can go in the oven and come out ready all in one step. But this is not possible in all cases. I learned the hard way. I saw one of my test tarts, the crust would go darker and darker while the raw apple filling would continue to stew stubbornly without browning. It cooked but it didn’t developed that beautiful caramel hue.
The reason is related to the thickness of the fruit, the way and shape it has been cut, and the amount of water in it. Sugar caramelization can only occur well above the boiling point. That’s why we bake most things at 350F or higher if we want them to brown. As long as there’s water in the fruit, the temperature will remain at boiling point. Thin slices of fruit will caramelize a lot faster than bigger chunks because water dries out quicker. I used a melon scoop to get nice apple spheres to go on my tart. These little spheres will require so long to caramelize that the pie crust will burn before it’s done. So they will cook separately while the crust is “baked blind”
Blind baking simply means, cooking the crust on its own. This is a great way to add extra control in the process of making tarts. Many tart shells can be cooked and store in the freezer until ready to use. They can be fully or partially baked. In the case of this recipe, I fully baked the shell. A couple of things to keep in mind when blind baking.
- Use baking weights, or rice, dry beans, to weigh down the bottom of the shell, otherwise it could bubble up and not stay flat on the baking mold. I recommend using proper ceramic or metallic weights, because they help transfer heat and cook the bottom of the crust. Adding weights will also help the crust walls in staying up, instead of collapsing and slumping, loosing their height and becoming thicker.
- Bake the first 20-30 mins at 400F, remove the weights and finish baking for anohter 10-15 minutes or until the shell is nice and golden in color.
One useful tip:
This pie has 3 components all of which can be cooked separately and at different times. Each component on a different day. The crust can be frozen and used weeks later. The apple filling should stay in the fridge for a solid week no problem. The pastry cream, about the same, although I’d suggest using it a bit earlier. But if all the prep is done correctly and nothing goes wrong, this whole process should take less than 2 hours.
Ingredients:
Pie Crust:
200g AP flour or cake flour
100g unsalted butter, 1 stick (here in the US at least)
100g granulated sugar
1 tsp kosher salt
1 large egg beaten
Apple/Black Currant filling:
5 peeled golden delicious apples
2 Tbsp granulated sugar
2 Tbsp unsalted chilled butter
1 Tbsp olive oil
1 tsp cinnamon powder
1 tsp lemon zest
Splash of lemon Juice
3 Tbsp black currant preserve or jam
Pastry Cream:
3 egg yolks
1 + 1/4 cup whole milk
1/2 tsp vanilla extract
2 Tbsp AP flour
2 Tbsp corn starch
1/4 cup granulated sugar

To make the pie crust.
Get your oven going now, 400F, it will be nice and cozy by the time you’re ready to bake. Combine the dry ingredients in a bowl, whisk to incorporate. Cut the chilled butter in small cubes, about 1/4 of an inch thick. Add to the flour. Using your index and thumb fingers, press the little cubes into the flour, patiently. You can use a food processor, which probably could get you a better final product, but I hate cleaning the damn thing so I used my hands instead, plus I want to be able to make this anywhere without depending on a food processor.
I believe you can get a pretty awesome pie crust if you are just patient, and work the butter until it breaks into smaller finer flakes. If you store the flour in the freezer like I do, the cold flour will help keep the butter cold longer, and your pie crust will thank you for it. Avoid working with soft butter, it will separate and make for a denser and tough crust. I also use eggs right out of my fridge for this crust. Everything should be cold. Beat the egg and add it to the bowl. Don’t fuss with it too much, we don’t want to develop gluten or too much of it.
Fold the egg into the flour mixture, allowing time for the flour to hydrate with the egg and form into a ball in the middle of the bowl. Cover with plastic wrap. Place in the fridge for at least 20 minutes. The colder the better… so longer in the fridge is better. I sometimes throw it in the freezer, of course, don’t let it freeze. When ready. Have a flat floured surface and a rolling pin ready. Squash the ball down, and form a disk of about an inch high. If the disk is too crumbly, and breaks everywhere, you could knead it a little bit but keep this to a minimum.
Roll out until you have a disk that’s larger than the tart dish by an inch or two. Oil or butter the pie dish and lay the dough on it. With the help of your fingers, press it down onto the dish. I use a knife to trim the excess dough that hangs over the dish edge, you can use the rolling pin as well. Just place the rolling pin over the dish press down and roll up and down, and that should do it.

Cut a couple of squares of tin foil (larger than the tart dish by a couple of inches) and line the tart dish, pressing the tin foil lightly against the dough. Let the overhang foil alone. It will protect the crust edge when baking so it doesn’t brown too fast. Place the baking weights over the tin foil and press gently making sure the weights conform to the shape of the tart. Stick the tart dish in the oven and bake for about 20 minutes. The crust will set at this point and partial browning can be seen. Remove the weights. Bake for another 10-20 minutes. It’s done. Store the crust in the freezer if you arent ready to use it right away, you could also let it rest on the counter. Be careful when handling it though. The pie dish will be very hot.
 To make the apple filling.
While the dough is resting and all that blind baking business is going, take advantage of the idle time and work on the apples and the pastry cream. Peel the apples and using a melon scoop, carve out as many apple spheres as you can from each apple. Why use a melon scooper? Because its fun. Heat up the butter and olive oil on a skillet and add the sugar, the apple spheres and the cinnamon. Cook on medium for about 30 minutes. Tossing every minute to make sure you get a nice uniform golden color on all the spheres. A caramel will also form and coat the spheres. Keep cooking until you are happy with the caramelization. Add the currant jam to the hot pan, and allow it to melt a bit. Toss and mix apples and currant jam well. Remove from heat, add the lemon zest and the splash of lemon juice. The apple spheres will be very soft so handle them carefully so they don’t break.
For the pastry cream.
Place the milk and the vanilla extract in a sauce pan, and bring to a boil, then lower the heat and keep the milk very hot but not boiling. Cream the yolks and sugar in a separate bowl. Add the flour and the cornstarch. Whisk until a uniform paste forms up. Slowly, pour the hot milk into this bowl and whisk to incorporate. It’s not mayo, so you can add the milk a bit at a time and whisk then add more milk until the mixture is uniform. Add this mixture back into the saucepan where you heated the milk, and bring to a simmer slowly, constantly whisking. The mixture will thicken rather quickly. Remove from the heat just before you’re happy with the thickening. Carry over heat will finish the job. You can later adjust it. If it got too thick which is usually the case, add some milk, doesn’t even need to be hot, and whisk until uniform. I like the consistency of mayo in my pastry cream. For pies, tarts, and filling pastries, make sure the cream is not runny.
To assemble the currant tart.
Simply spread a uniform layer of pastry cream over the bottom of the pie crust. I don’t like to use too much cream. Makes the tart too rich and heavy. I like the fruit filling to stand out. Up to you. The layer should be about 1/8 inch approximately. Place the tart back in the freezer so the pastry cream hardens a bit. This way when the apple filling is added, you can spread on top of the cream and avoid the 2 mixing. Makes a prettier pie when the layers occupy their own spaces! After 10-20 mins, remove tart from the freezer and add the apple filling spreading it uniformly over the pastry cream-covered bottom. Place in the fridge. This pie is great cold or at room temperature. I like to let it sit in the fridge overnight and bring it out the next day for prompt consumption 🙂 Enjoy! Tart season is officially on here at that other cooking blog!

Wanna get more sous-vide cooking guides and cool cooking how-to’s in your mailbox? You know what needs to be done!
We never spam. You should only be getting updates when new content is posted on the site. We also respect your privacy. We don’t share your email address with anyone and you can unsubscribe anytime!


42 comments
I made a (pumpkin) pie with my own crust for the first time this weekend and I didn’t find it easy either, I can relate with the thickness not being uniform etc… It doesn´t matter thought because it’s homemade and beauty is in the imperfections. Your pie looks really wonderful, congrats! If I was your neighbour I’d want to pop over for a slice 😉
and that would be great! would love to share that big pie 🙂 actually, that pie is gone, but I have another one in the fridge, a raspberry one. I’ve been baking pies trying to get a little better at it. I need some more practice, but I agree, home made food and the imperfections that go with it are beautiful. thanks for the encouragement, Sofia!
I agree with you about the ceramic baking weights – they are an improvement over the beans I used to use. I love tarts filled with fruit curds. In making them, I have found that special tart pans with their removable bottoms and straight sides work best with blind baking rather than a conventional pie pan.
you know, I’ve been meaning to get one of those pans. They just look more practical, slick and getting the tart out of the pan should be easier. So much to learn! 🙂 thank you for stopping by and reading the post!
I bought my first tart pan in a Paris cookery shop, so it is special to me. And, after using it for blind baking, I realize that the shorter straight sides really help (along with the weights) to keep the crust from shrinking. Have fun with one when you get it!
Thanks for the tip! I haven’t been to Paris yet, but if I ever visit, I’ll make sure I leave with a crate of pastry ware! 🙂
This looks just lovely and as said above, some home made “imperfections” are quite charming 🙂
thank you so much! getting encouraged here :)!!!
I could totally eat this right now!!!!
hahahah 🙂 thank you!
How delicious! I’m no professional, but this tart looks perfect to me!
you are too nice!!! 🙂 thank you! don’t get me wrong, I threw a party when I finished it and it didn’t end up in disaster, but there were a couple of things I still want to improve upon. thank you for stopping by!
I think it turned out beautifully!
thank you!!!
That is one sexy tart. Be still my heart. Thanks for sharing the recipe!
thank you Cheryl! sexy is such an awesome compliment! 🙂
I think it’s a great looking tart, Paul. We’re all our worst critics, imperfections being the charm of homemade baked goods.
thanks John! glad you liked it. We really are our worst critics, but that’s a good thing.
The tarts look delicious! And great tips as well. I’ve been meaning to pick up ceramic pie weights but always thought it was a redundant purchase, but if they perform better than beans I am all for trying!
thanks Gen! the thing with rice or beans is that those will not heat up like ceramic or metallic weights would, which really help getting that bottom of the crust cooked properly. But billions of pies have been cooked using beans, is just a slight difference but professional cooks want that.
Looks really Delicious! Baking dessert is a bit out of my comfort zone, but perhaps I should give it a try as well.
Thank you!! And you should absolutely get into it. Pastry can also be savory as you know, and baking and pastry making help me understand a lot of the science behind food in general which you are really good at. Granted, I’ve only cooked desserts a few times 🙂
You got a great point.
Pastry making seems to require a lot more skills and precision. It would be interesting to understand the science behind it and see if some of the requirements can be relaxed and still make great pastry.
yeah, even though it requires more measuring it’s not an exact science either, too many variables to control for any normal human being haha, bread making requires the least measuring. So you could start there 🙂 A basic bread = water, bread flour, yeast, pinch of salt. The flour to water ratio: 5:3 give or take. knead well, until dough is nice and elastic and then rise twice, one hour each, proof for a few minutes before going in the hot oven at 400F, bake until internal temperature reaches 200F.
I think it looks perfectly delicious! plus I like crust :d so no such thing as it being too thick!
Hahaha thank you 🙂 that’s really nice to hear!!
This is a great tart – you should be very proud (despite the protestations of it’s perfection in your first paragraph, haha). Just gorgeous photos and great recipe.
yay! so glad you liked it! thank you 🙂 Up close is a little more imperfect than in the photos hahah. Thanks for your compliment on the photography, I really enjoy this aspect of food blogging.
I am in awe of the tart – you are a perfectionist, I see – that’s a good thing in a cook. 😉 Yes, your photography is magazine worthy – I am super impressed.
thank you so much! really encouraging compliments, Shanna. Seriously appreciated.
Of course! They are heart-felt compliments and well-deserved by you. I am looking forward to reading about what comes out of your fantastic kitchen – through your lens. 🙂
you’re too nice. I don’t think my next post is going to be very popular but I will post it anyways 🙂 its about tripe. we’ll see how it goes!
Oh, I am intrigued – and excited! It’s going to be super, I’m sure. Will keep my eyes peeled. 🙂
hahah oh boy, pressure’s on! 🙂
😉
This looks amazing!!!
thank you Emily!!!
Sounds like a wonderful tart. I applaud the addition of the black currant preserves, and I think the little apple balls are adorable.
thank you Susan! really appreciate your nice compliments 🙂
thank you so much for the mention!!!