
Let me say hi first. It’s been a while since I last added an entry on my blog. I have been bogged down by a recent leg injury that limited my mobility a bit. Still bothers me. It will most likely require surgery according to one of the 5 doctors I saw. It’s a minor procedure and the recovery time is 2 weeks so I’m not too concerned about it plus in the last week or so I’ve been feeling much better and my walking almost feels/looks normal again. My walking-dead days are finally behind me now and I look forward to a brighter future full of miso milk buns.
Ingredients (makes 7-10 buns):
500g AP flour
300g whole milk
2 tbsp red miso paste
1 tbsp sugar
1 tsp active yeast
1 tsp salt

About this steamed miso milk buns.
I love steamed buns. They’re extremely soft and tender. It’s like a marshmallow. The fat in the milk gives this dough that brioche quality which can be enhanced with additional butter or other fats but I like to keep things simple and I love milk. The addition of miso paste gives it a great sweet and savory finish which for whatever reason kept me wishing I had some strawberry jam at hand. I haven’t tried that pairing yet but in my head, it totally works 🙂
Proofing yeast, is that needed?
This is optional if you are confident your yeast is still alive and kicking but if you have any doubts, mix the milk and the sugar and microwave till lukewarm. Add the yeast and stir. In a few minutes, you should start seeing bubbles and within half an hour a foamy head should have built up. If you don’t see any of this… the yeast is certainly dead. Game over. Otherwise, you’re good to go so let’s get baking.
Get that stand mixer out.
I’m a fan of stand mixers (at least I’m a fan of mine.. good old KitchenAid Artisan) and haven’t kneaded anything by hand since I can remember but certainly not a deal breaker if you haven’t got one. Kneading by hand can be therapeutic and a bit of a workout which is a bonus in my opinion. It’s an art and a science that requires reading and practicing and I suggest youtube tutorials or books like Bouchon (I learned a ton from this one) or Modernist Cuisine Bread (which I can’t wait to get)
Mixing it up.
Add all the ingredients to your stand mixer’s bowl and mix at low speed for a good 15 minutes or so. The dough will come together and start “slapping” the wall of the bowl although I don’t necessarily consider that a great indicator of when a dough is ready. Bouchon recommends 600 to 1500 revolutions of the dough hook. The Artisan at it slowest setting delivers 97 rpm. I’d recommend using your mixer in the slowest setting. If you have another brand or model you can find that information in the manual or you can roughly time it yourself and a little bit of math to estimate its rpm and then calculate the number of minutes your mixer needs to work…. at 97 rpm, the artisan requires about 15 minutes to get to 1500 revolutions.

First rise.
Scrape the dough off the hook. Remove the hook and set it aside. Dust your work area with some flour and knead the dough into a ball making sure the seam sits at the bottom. Place the ball back into the mixing bowl. Cover the bowl with plastic wrap or a damp towel and allow to ferment. An easy rule of thumb to help us determine when this phase is ready dictates that dough should ferment at least until the volume of the dough has doubled. At room temperature ( 70F) using healthy yeast, this can take about 1 to 2 hours. Yeasts and flours aren’t all equal. Practice is the only way to get a good sense of how this works.
A bit more on dough fermentation.
There are mainly 2 reasons for letting the dough ferment. One is to create CO2 bubbles that will eventually expand when heat is applied and the reason bread is spongy. The other one is flavor. Fermentation of the sugars in the dough translates into a number of complex and delicious flavors and a drop in PH due to the production of lactic acid. Short fermentation times yield less complex tasting bread. Go longer and you might end up with acidic bread like sourdough. The temperature of your kitchen will also play a big role in how long you ferment for. So, yes, lots to think about when proofing dough.
Overnight fridge-first-rise.
This is a great option for slowing down fermentation activity if you find yourself in a situation in which you can’t bake the bread on the same say. Slow fermentation is also said to better develop flavor and keeping acidification from going too far. I fermented these buns in the fridge for convenience and flavor. You can freeze the dough as well if you want to completely stop fermentation and store the dough indefinitely. Thaw overnight (probably best in the fridge. I’ve never had to do this).

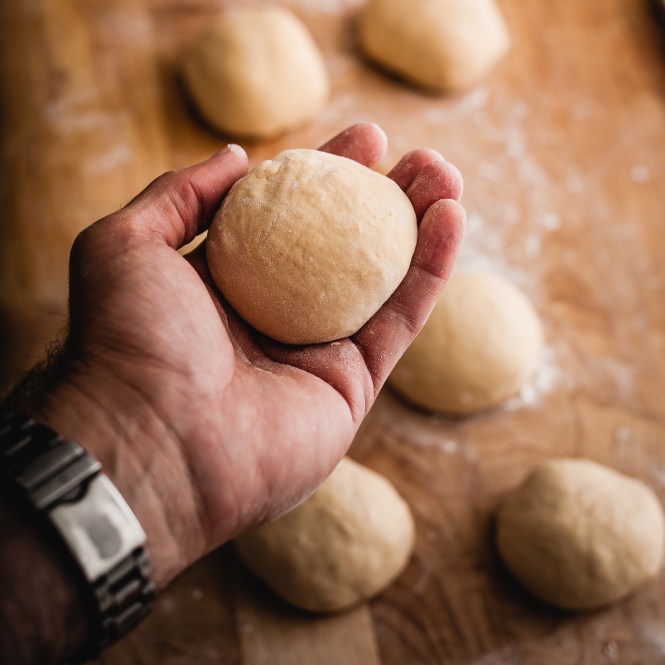
Shaping the buns.
Dust your work area with some flour. Handle the dough with care. You can deflate it but don’t pound on it. Rather shape it into a cylinder always making sure the seams stay at the bottom (you’re really trying to protect the structure and trap as much CO2 as possible). Cut the cylinder into 7-10 portions of equal size and shape those into balls. Again, make sure the seam sits at the bottom. Arrange them on your work area and cover them with a dry towel.
Second rise.
This time you’re letting the buns develop extra CO2 right before they go into the steamer. Let the buns rest for 30 mins to an hour.
Steamer station.
Prep your steaming station. I use a large pot with about an inch of water and a canning basket raised over the water level using whatever I can find. I use a strainer that has no handle so it fits in the pot. Place parchment paper over the basket and bring the water to a boil. Have the lid ready. Also, keep a damp kitchen towel handy.

Steam away and you’re done.
Place the dough balls in the steamer. Cover the pot with the damp kitchen towel and place the lid on top. Fold the corners of the kitchen towels over the lid. This will prevent condensed water vapor from dripping back down over the dough balls and instead stick to the towel. Remember, you have a piece of fabric over the stove so make sure you work safely. Steam for 15 minutes but since you’re steaming there’s no risk for overcooking the buns. In some of my tests, I steamed the buns for over an hour and I actually liked the result better. Work in batches if necessary. Getting a big bamboo steamer is definitely on my list. Comments, feedback, suggestions, constructive criticism always welcome!

Wanna get more sous-vide cooking guides and cool cooking how-to’s in your mailbox? You know what needs to be done!
We never spam. You should only be getting updates when new content is posted on the site. We also respect your privacy. We don’t share your email address with anyone and you can unsubscribe anytime!
4 comments
Beautiful. Steamed buns are really magical.
thank you Mimi! 🙂 they truly are
This was fun to make! How do you store them and reheat? Thanks!
Reheating a milk bun… that’s something I never thought about.. they don’t last that long around here! I would suggest steaming them again. No microwave. Maybe try the oven at low temperature. You might need to spray water into the oven.. which is basically the same as steaming them in a pot. Thanks for trying this out!