
A week or so ago I posted the first article of this phone food photography series in which I covered what I consider to be the 5 areas everybody with an interest in improving their photo skills should get pretty good at. I’m trying to keep these tips as short and concise as possible and I hope you find them helpful. Based on these first 2 photos and the ones on my last post, you probably think I live at a burger joint. I do.
In this article I will go over a few more concepts equally simple, stuff you can start applying right away. No gear or software needed maybe a free app here and there 😉 Actually, on this post I kept my photo post-editing to a minimum, sun light did all the hard work for me. The sun is the best light for food photography. Also, these tips relate to DSLR shooting or any kind of camera gear you own really. Let’s dive in again!

- Same deal as above. Cropped in post and some color correction done in snapseed to get the shot looking better.

1.Level your shot.

- It’s like I’m about to go over board… really crooked pic. Sometimes this framing works, but mainly, it doesn’t

Crooked horizons are famous across the world of amateur photography. I can’t recall the number of times I have taken a picture with a crooked horizon line. I mean, it’s really hard to actually get it right, even with tons of practice. Maybe with some preparation, a tripod, a level, etc.. but otherwise, it’s just hard.
Nothing worse than a crooked horizon line when looking at a sunset pic right? So let’s not do this or at least fix it in post.

- this is a bit better, not grate, the blinds in the back still feel unbalanced.. but it’s an improvement.

Even if minimally I usually need to correct this annoying issue in post. Thankfully, this is doable inside the phone via the photo editing tools on the camera app or via plenty of other free apps. Just rotate the pic until it looks right and natural.
When it comes to food, things get a bit trickier though. There’s rarely a horizon line in the picture and yet, the shot can easily be shot at a weird angle that just makes it uncomfortable to look at. I’ve seen successful food photography in which the shot was taken at a weird angle, but the person behind the camera was a professional or a really lucky person. In most cases and I mean, most, gravity should point straight down and not in weird exotic directions.
2. Simplify your backgrounds.

- All my crap in the background.. horrendous. Not even cropping could fix that. Clone stamping… if you’re a magician you could paint that stuff out. Good luck.

This tip has more to do with food styling and composition (also cropping which we covered in the previous article) than with photography. Some people have the gift of home decoration. A rag, some orange pillow over in that corner, great colour accent, the whole room comes together. I don’t have that skill. I don’t even like furniture all that much. I enjoy visual simplicity otherwise I get stressed (I’m way way OCD) and that’s how I tend to compose my pictures. Really simply.
The complexity of composing a shot goes up with the number of props in the scene. I’m pretty sure about this one. I think if you’re just getting started in food photography…

- Better framing and no crap in the background. There’s still stuff showing up in the corners but a little cropping action should take care of that.

keep your backgrounds as simple as possible. A clean backdrop, a simple plate, the food and go from there. It’s very easy to get distracted away from the food when too many object surround it. When I take photos of food at a bar for example, I remove my sunglasses. If there are too many coasters, I leave one in frame, maybe a portion of another in frame, I really try to get the complexity of the scene down to what really matters. My hamburger.
3. Wipe your lens.

- hamburger grease got on this lens…. awful awful disaster… imagine going through an entire photo shoot with a dirty lens like this… heartbreaking stuff. It’s happened.

This should be lesson number one in photography. It’s also common sense yet it happens all the time, dirty lenses. Greasy fingers are the worst enemy of phone photographers. I make this mistake pretty much everyday. A tiny imperceptible smudge over the camera lens and your whole shoot will be ruined. Nothing you can do about this other than… keep your phone smudge free. Really hard thing to do, specially when photographing food, that’s when fingers are at their greasiest.

- slightly better framing and CLEAN lens. The way it should aways stay.

If you plan on using JUST your phone to photograph your creations, then getting in the habit of wiping the lens clean before shooting should be routine and part of your prep. That’s what I do when I shoot with my DSLR which btw is mainly what I use to shoot food.
4. Use the Volume buttons to click.
Or not, depends on the shot. I won’t include a pic for this one. On my phone for example, having to look for that virtual trigger on the touch screen distracts me from framing the shot. Many cameras with touch screens have that problem. Phone photographers may have a hard time finding that virtual trigger on their touchscreens. I own an iPhone 5s at the moment, and when taking pictures, the volume buttons can be used as the trigger, and I often use them because I know where they are. I wish they were more sensitive, you really have to press down hard to activate them and that frequently introduces shakiness and blur, but with some practice, they can be mastered. Just keep that in mind as an option.
5. Diffused and Direct Sun Lighting.

- Backlight direct sunlight. I love how it works here. Flowers have amazing translucency properties and some foods do as well. Others don’t. Use direct sunlight to your advantage when possible.

I talked about indirect sunlight in the previous post. Now, how about direct sunlight. It’s awesome lighting but a bit trickier to use. It can also be diffused. How do you diffuse direct sunlight. Well, any translucent piece of thin white fabric is ideal. Most thin white fabric is translucent and I’m guessing fairly easy to find around the house. Anything that is translucent and white should do the trick, just place it in between your food and the sun and the light will become diffused.

- In food photography, soft diffused sun lighting like this will work in most cases. If you happen to be by a window with a soft translucent curtain, you’ll love the look of your pics. It’s an amazing way to light food photos.

Diffusing sunlight or any light source will diminish the intensity of that light source. That means, your exposure settings will have to be adjusted. Luckily, most phones will do that automatically, but it is good to understand that the exposure of the shot might require a little longer since there’s less light available… which means…? You need to hold that phone super steady or otherwise the shot won’t be as sharp as it should be.
6. Wear neutral colours when shooting.

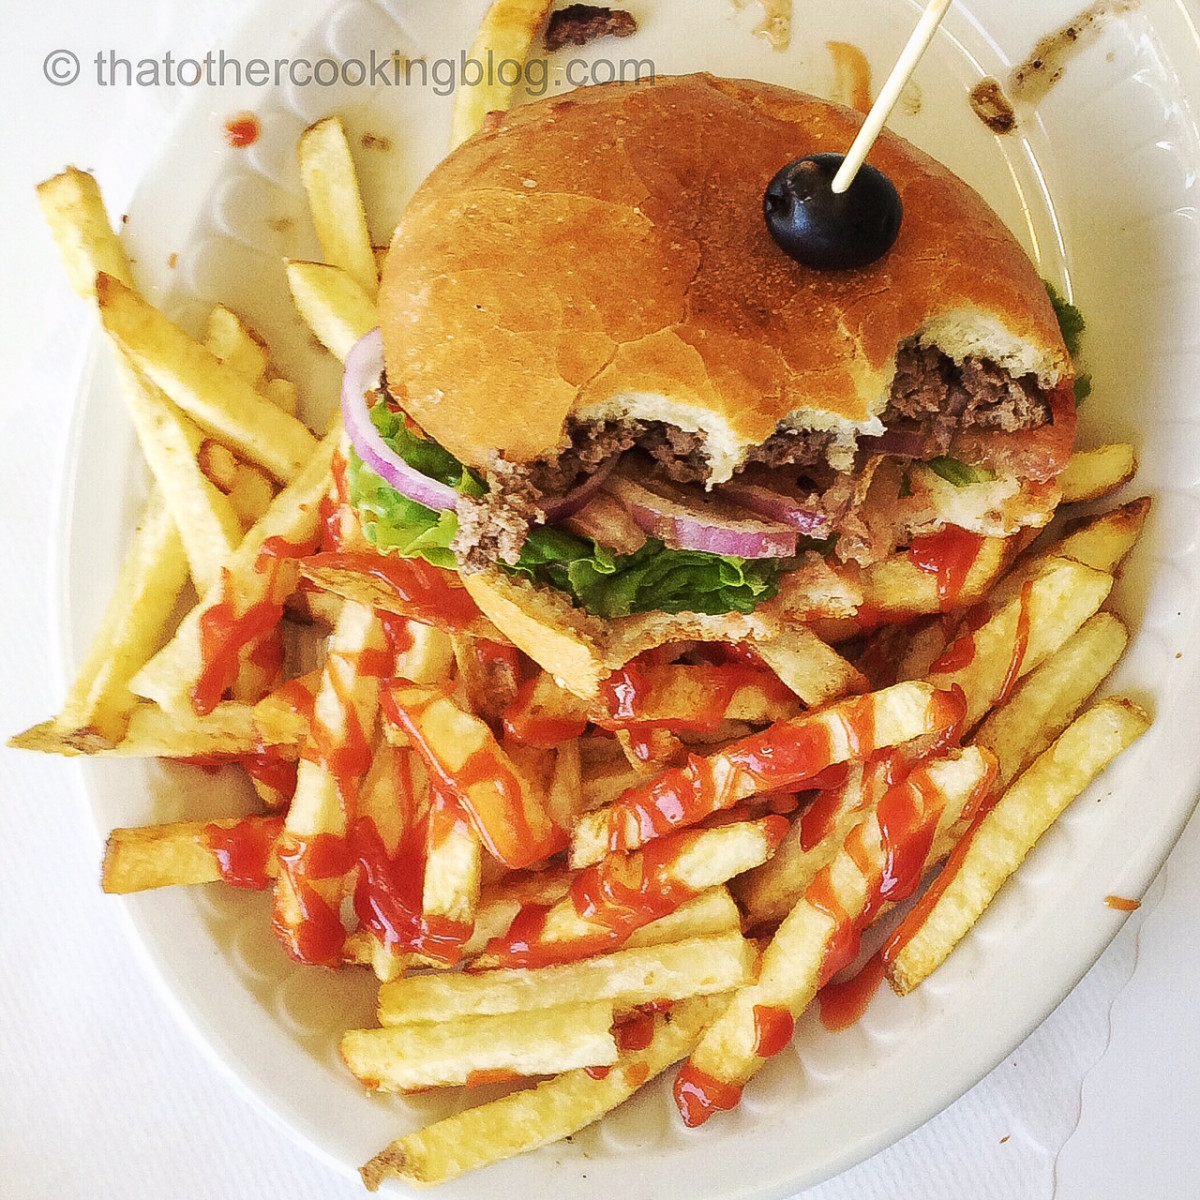
- red cast from my soccer jersey… kill me, it will throw off any white balancing. Doom.

Might sound weird, but trust me, this is rather important, specially if you really want to take your food photography to the next level. Wear a neutral color or desaturated outfit. Food photography is close up photography in many cases, so any colour we wear might end up reflected on the food we are shooting. I love wearing red t-shirts. My photographs hate me when I do.

- AH! we’re back… the color of the plate is basically just the color of the light, a bit bluish, but that’s ok. It’s bounced soft sun light.

Sometimes I forget and go through an entire photo shoot wearing my spanish soccer team jersey, I mean, doesn’t get any redder than that thing, believe me. When I do, I introduce unwanted red reflections and a red cast on the entire picture. I hate my life during post. This is a PAIN to remove. Any bright colors will have the same effect. I’m sure when you go out dining, choosing your outfit isn’t driven by your food photography obsession and I hope it isn’t. We all may wanna wear our favourite outfits and look awesome, right? 😉 Just help it if you can, specially at home when shooting in a controlled environment.
7. Flattening perspective.

- this shot is alright i guess… but there’s a lot of foreshortening caused by the small lens on the phone, a wide angle lens. It can be a good thing or a bad thing. I like to shoot food with less distortion or foreshortening though.

We’re getting fancy now. I love wide angle photography, specially if I’m shooting landscapes and stuff like that. For food though, I prefer longer lenses… but let me slow down a bit here and talk about focal length first. This is simply the distance of the lens to the image sensor inside the camera when the lens is focused at infinity. It’s measured in milliliters… and I realize most people are already yawning including myself…this is a hard one to explain in simple terms though. Phone cameras have small little lenses that have a wide field of view.

- This is basically the same shot but I have digital zoom on. I’m moving my camera away from the subject and zooming back in until I get the framing I want. This way I reduce the foreshortening and flatten the perspective on the image. Resolution takes a bad hit though. Keep that in mind.

Basically they can see more of the world in front of the lens. With a zoom lens, the lens sees less of the world but gets closer to it. Ok, I’m confusing even myself now.. the best way to explain this without all the technical terms is with photos so let’s look at the pics here. We have the same subject shot 2 ways. With and without zoom. When we want to flatten perspective, the only way to do it on a phone is to use the digital zoom on the camera. Move the phone away from the subject and zoom right back in. The only problem is that digital zooms aren’t the same as physical zooms. The way a digital camera zooms in.. is really crappy actually. They just crop the picture, so there’s always a loss in resolution. Your pixels will become bigger and there will be detail loss. There’s no way around this. So keep your digital zooming to a minimum and your pictures will still look crispy.
8. Explore your subject.
If you have the luxury of time.. and by this I mean, you’re not just trying to snap a quick pic while nobody is looking at some fancy restaurant or some burger joint.. I get self conscious about this sometimes and rush the shot (even at McDonalds)… you should try to spend sometime taking pics from as many angles as possible and try spinning the plate around. You might discover that your dish looks nicer from a different angle. I do this all the time. I take a lot of pictures and then sort through them and select the winners. In a single photo shoot I take about 50 pics and then select 3, maybe 4 and post those on the given article. It might seem excessive, but it pays off. Also, be your own most unforgiving critic. It sucks but it helps.


Wanna get more sous-vide cooking guides and cool cooking how-to’s in your mailbox? You know what needs to be done!
We never spam. You should only be getting updates when new content is posted on the site. We also respect your privacy. We don’t share your email address with anyone and you can unsubscribe anytime!
5 comments
Fascinating! I never thought about what I was wearing when taking a food photo – but I will now! Thank you for sharing!
you’re welcome Becky!
relink