
Alright, it’s almost midnight on Dec 31. Time to wrap it up for the year 2019. I figured I’d cook something completely different from what I usually cook during the holidays. Don’t ask me how I ended up with this choice (drunken internet browsing for sure) but I’m extremely happy I did and to be absolutely honest I had some serious reservations regarding this dish (I thought it was going to be a sodium time bomb) but in the end, it all worked out great! So…Happy 2020 everyone!!! My best wishes to all of you, etc! It’s time to get in the sous vide zone and make one amazingly delicious soy sauce cornish hens! Now get your apron on or at least wear something. Boom.

The Fine Print.
Before we continue I need to disclose a few things first though. I have never made nor have I had soy sauce chicken in my life. My only experience with this recipe extends to a few youtube clips and internet searches a few nights ago. I mean, in theory, there seems to not be much to it. You boil a whole chicken in a soy sauce solution plus a few extra ingredients and you’re kinda done. That’s on the surface though. The ingredients at play are incredibly complex in flavor and I wanted to capitalize on that. We have black vinegar and Shanxi vinegar which are unlike any western vinegar I know. Dark soy sauce as well. Then we have Christmas notes from the ginger and the star anise. The end result is mind-blowing.
Sometimes less is more.
I also wanted to reduce waste which was a huge reason for me to want to share this recipe and go over all the steps. Traditional soy sauce chicken uses a fair amount of soy sauce and other ingredients that aren’t cheap. These ingredients then get diluted in water. We’re gonna do things differently and we’re going to use sous vide to accomplish it. Using just a fraction of the liquid ingredients in the traditional approach we’re going to end up with an incredibly flavorful dish and here’s how!

Ingredients (serves 4):
- 2 Cornish hens.
- 70ml Chinese dark soy sauce (or regular)
- 70ml rice wine
- 35ml black vinegar
- 35ml Shanxi vinegar
- 40 g rock sugar, white sugar or brown sugar.
- 8 garlic cloves. Crushed.
- 8 green onions. Finely chopped. + 2 more for garnish. Chopped to your liking.
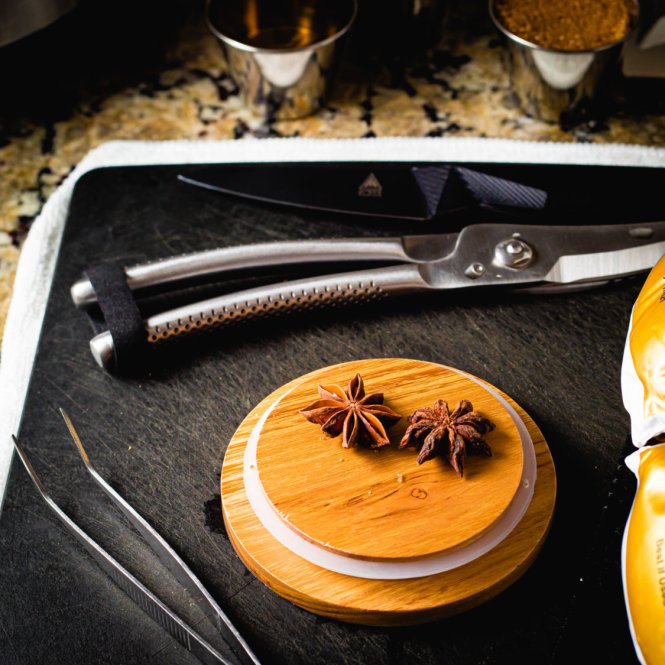
- 2 star anise pods
- 20g ginger. Finely chopped.
- 1 Tbsp vegetable oil
- 100ml water
- Sesame seeds for garnishing.
- Steamed rice for serving.

Step 1: Green onion, ginger, and garlic need some color.
In a saucepan, heat up the vegetable oil. Medium heat is fine. Add the ginger and give it some color. It should be nice and golden. Add the star anise pods and roast them a bit too. Don’t let anything burn. Now add the onions and the garlic and get a slight be of color on those as well.

Step 2: Making the stock.
Add all the liquid ingredients and the sugar to that same pot and simmer for about an hour and a half, covered with a lid. Due to evaporation, you will need to add water as time goes by. Just keep things fluid in that pot and don’t worry too much about precision.

Step 3: The Soy Sauce Reduction.
Now that the stock has been cooking for an hour and a half or so you have the option to keep it in the fridge overnight which I recommend but if you wanna get this done the same day then skip that. Strain the liquid and discard the solids. They’ve done their part. Now, over low heat simmer the sauce in a pan until you have about 150ml left. About half… should start feeling syrupy.

Step 4: Halving the hens.
So, now we get to prep the poultry. I recommend cutting the hens in half so you don’t have to deal with the cavity during sous vide cooking which can complicate things. It’s also a nice way to present the dish so it works out well. Use a good solid sharp knife or poultry shears.
Step 5: Painting the hens.
Before bagging, you can give the hens a coat of soy sauce reduction glaze. This is optional and I did try both ways. With the coat of paint, the cornish hens just had a much deeper and uniform golden color after they were cooked. But up to you. Flavor-wise there’s virtually no difference.

Step 5: Bagging the hens.
Let the soy sauce reduction cool down to room temperature because you need to add it to the baggies before vacuum sealing. If you vacuum-seal a hot liquid it will boil over. I vacuum packed each half individually for better control. Divide the glaze into 5 portions and reserve the last for serving. Place the hen halves in the baggies and add the soy sauce reduction to the baggies. massage the hens to distribute the glaze and coat the hens evenly. Vacuum seal.

Step 6: Sous vide.
As in most sous vide recipes. The sous vide step is the simplest. Cook at 152.5F for 4 hours.
Step 7: Before serving.
Remove the hens from the baggies and place them on a work surface. Reserve the cooking liquid from the baggies because that stuff is gold and goes incredibly well over steamed rice. Now, using that 5th portion of glaze we previously reserved, coat the hens again a few times right before serving.

Step 8: Serving.
The hens are ready to serve after the sous vide step. No need to cool them down. Julienne the green portion of the green onions you reserved for garnishing. Sprinkle sesame seeds over the chicken and the rice. Top the hens with the julienned green onions. Serve the cooking liquid on the side as a dipping sauce or for seasoning your white rice. And that’s it!


Wanna get more sous-vide cooking guides and cool cooking how-to’s in your mailbox? You know what needs to be done!
We never spam. You should only be getting updates when new content is posted on the site. We also respect your privacy. We don’t share your email address with anyone and you can unsubscribe anytime!
3 comments
beautiful photography!
thank you Tiffany! Happy 2020z You’re my first comment! 🙂
Happy 2020 to you too!