Blogging is an international thing I understand, but I still want to extend a happy thanksgiving day to everyone that’s reading this and celebrated turkey day. And yes, I did 🙂 I cooked something on this wonderful holiday, and I will be posting in the upcoming days. I really want to post about the zebra cake, because every time I find a post that is inspiring and makes me wanna try new things, and makes me wanna find the time and dedication to execute it, it’s a wonderful experience. I really dig finding recipes when I least expect it, specially recipes from fellow bloggers. Fae, who runs a beautiful blog, fae-magazine.com, an incredible collection of recipes that show her passion and personal style for cooking, photography and writing. I’m not well versed in the art of baking cakes, I’ve only made a few (and not very successfully) but following Fae’s instructions, I was able to pull off a pretty decent version of a zebra cake. To find more about the history of this cake, better go to Fae’s post and find out the details! My post won’t be as entertaining, and mainly just a collection of photos I took during the making of! Hope you enjoy!
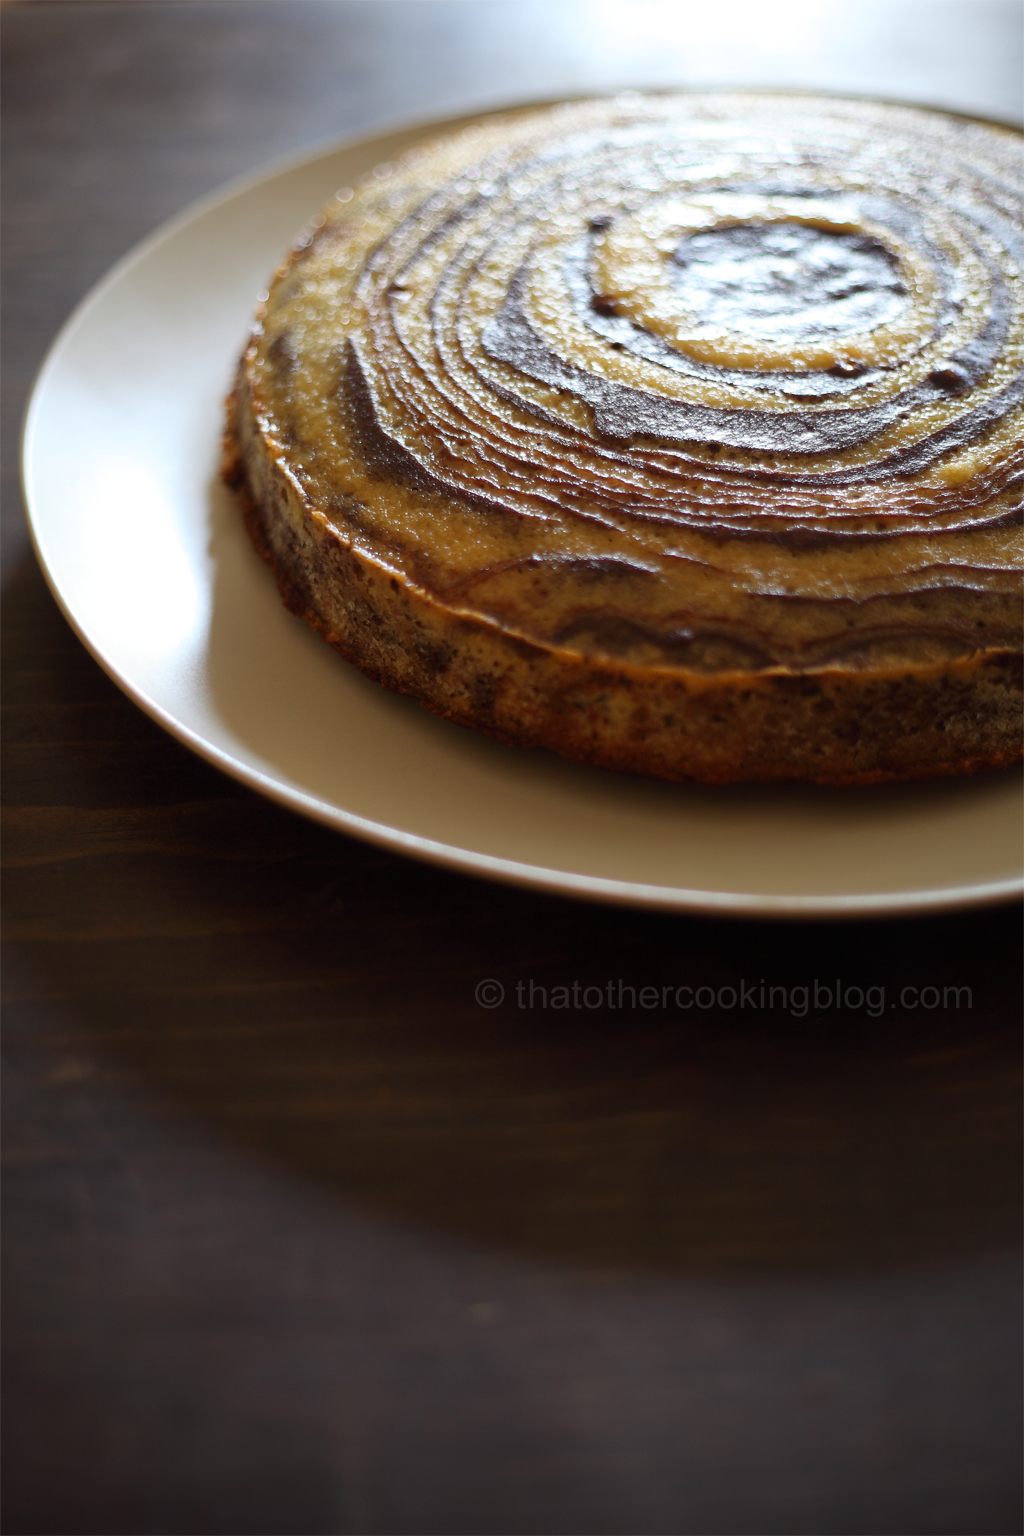
I’m not gonna lie. This cake requires patience and a bit of precision… patience I think I have. Precision.. as you can see, not so much. The rings are not as even as I would have wished they were, but hey, this is the first time trying this so I’m not entirely embarrassed. The rings are the result of pouring 2 different batters intermittently, always pouring at the center of the baking pan. The more even the pouring and the closer to the center each pour lands on the center, the better the results. I didn’t have a cake pan, which complicated things a bit for me, so I used a cast iron dutch oven, lined with parchment paper to prevent any sticking. Anyways, this is a fun looking cake, perfect for special occasions, like kid’s birthdays. Since I don’t have kids, I will try this again for when my little nephew Sebastian is visiting and his birthday is up, maybe for when he’s visiting aside from birthdays!
Ingredients (Fae’s recipe):
2 1/3 cups (10.5 oz / 300 g) sifted unbleached all-purpose flour
1 Tbsp baking powder
¼ tsp salt
4 large eggs – at room temperature
1¾ cups (12 wt oz/350 g) granulated sugar
1 cup (8.5 fl oz/250 ml) whole milk – at room temperature
½ cup (4 fl oz/125 ml) vegetable oil
½ cup (4 wt oz/113 gr) unsalted butter – melted but cool
1 Tbsp pure vanilla extract
3½ Tbsp natural unsweetened cocoa powder (Hershey’s)
Fae’s instructions (and I quote!!!):
– Position rack in middle of oven and preheat to 350F.
– Slightly spray 9”/23 cm round by 1.5”/4 cm deep non-stick cake pan (or spring form pan) with non-stick spray and line with parchment paper cut to size.
– In a bowl, whisk together flour, baking powder, salt, and set aside.
– In a large bowl, combine eggs, sugar, and beat (with electric beater) on high until foamy, light creamy color (2 minutes). Add oil, butter, milk, vanilla, and continue beating until well combined.
– Turn the beater speed to low and as it is beating, sprinkle flour mixture tablespoon at a time, and blend well.
It should make about 7 liquid cups of flowing-consistency batter.
– To split the batter into two, pour half of the batter (about 3.5 liquid cups) into a different bowl. In the beater’s bowl (with half of the batter), add cocoa powder and beat until well dissolved/mixed.
[2] Hints to read before assembly (I’m still quoting!):
– Place the prepared baking pan on flat surface.
– Place one regular tablespoon for the white and another for the dark batters.
– Scrape bottom of the spoon on bowl’s edge each time, to avoid dripping. Periodically, stir each batter with its own spoon for consistency.
– Starting with the white batter, pour 2 Tbsp (up to 3 Tbsp, no more) of each batter alternatively into exact center of baking pan. The key is not stopping and keep-on going, pouring alternatively, the same amount of batter on top of each other, only in the center. Batter will spread on its own, gradually filling the pan, with multi-rings. For the very last two pourings (most probably the cocoa/dark batter/bull’s eye at the end), only pour 1 Tbsp each.
When completed, batter in the baking pan should look like a fine-lined dartboard.
– Note: While alternately pouring, if the bull’s eye (last dark batter poured) is shifting from the center, gently/slightly lift edge of the baking pan and adjust the bull’s eye back to the center of the baking pan and then continue the process. No other movements of the baking pan to be made.
– With 2 Tbsp each pouring, there will be about 14~15 rings/stripes of each color.
Batter assembly/layering process (yep… is all Fae’s instructions):
– Start with the plain/white batter, pour 2 Tbsp, aiming at the exact center of baking pan. Follow this with 2 Tbsp of cocoa batter, right over the white batter, at the exact center of the baking pan. Repeat this 13~14 more times until both batters are finished.
– Place baking pan in oven and bake for 50~60 minutes or until poked wooden skewer in the center comes out clean.
– Cool the cake in its pan. When cooled, if needed, slide plastic knife along the sides of the baking pan to loosen the cake. Invert cake onto a plate, pull off the parchment lining, and invert onto the serving platter.
(End of Fae’s instructional) So, back to me! I honestly thought I would not be able to pull this off. I had to keep telling myself to “breath, relax, it’s only 11pm, it will soon be over” but it was so worth it, learned a few cake related things, and I took the cake to work the next day and everybody it, I even took the leftovers to my sister’s birthday… yes, I did this.. and it gets worse… she celebrated her birthday at a restaurant, and I’m not the restaurant reviewer type, but I have to say that Gjelinas was one of the best trendy restaurants restaurants in west LA I’ve been to…, ok, so yes, I took leftover cake and the guys at the restaurant paired it with amaretti gelato, we stuck a candle on it… it was pretty epic. They went with it, how cool is that… That’s all I got tonight! Cheerios!
Wanna get more sous-vide cooking guides and cool cooking how-to’s in your mailbox? You know what needs to be done!
We never spam. You should only be getting updates when new content is posted on the site. We also respect your privacy. We don’t share your email address with anyone and you can unsubscribe anytime!


44 comments
Paul, You made it and with a cast iron dutch oven at that. Your zebra cake looks beautiful! The photos look so real that I want to poke the cake! Thank you for the kind mention. 😀 Fae.
Thanks Fae! I want to submit it to your special section,
“look, I made it!” Need to work on that. Thanks again for letting me feature your recipe on my blog. Glad you like the pics!!! 🙂
Hi Paul, You don’t need to do anything. I am working on it as we speak! Posting on my FB first. You’ll see it in FTT in an hour or so. 😀
hahahah! yay! 🙂 thanks Fae!
Wow, this looks amazing, especially considering you’ve never made it before! You must have lots of patience to be able to execute such good zebra-ing!
hahha 🙂 thanks! my zebra-ing skills went up dramatically after the first half hour into the process 🙂
Paul, WHAT A GREAT JOB! I am so incredibly impressed. It looks fabulous (and I am sure tastes it, too, based on your ingredients and technique). WELL DONE. I cannot wait to try this, though I will admit – it looks a tad daunting. I do hope that you try this for Sebastian’s birthday – no one can argue with this cake. My birthday is coming up and I am happy to send you my address. Haha! 🙂 I bet Madame Fae is quite proud of you. Have a lovely Saturday night! Best, Shanna
Thanks Shanna! I’m so glad you liked the post! It is a bit of work, and requires time to get the proper effect, but it is a bit forgiving so try it and let me know! I don’t know if this cake would survive a fedex adventure 😉 hahah You too have a beautiful weekend! thanks for stopping by!
Very impressive! Especially given that you improvised with a dutch oven. Bravo! Looks delicious!
thank you! seriously! 🙂
Oh my gosh…do I love this or what??? My daughter Jessica is totally into zebras. I’m making this today. Well, attempting, and praying that mine turns out at pretty as yours… LOVE!! <3
hahah that’s cute! I hope your zebra cake turns out awesome and that your little girl loves it! thanks for the lovely comment! 🙂
Beautiful!!!!! I am impressed with the use of the dutch oven as well! I want to try making this cake sometime! Yum yum yum
thanks Jess! the dutch oven.. well, I had no choice, I had taken out all the ingredients, and done all the prep, and then I realize that I actually don’t have a cake pan.. I had to do what I had to do, I went old school! hahah
It did the job quite nicely!
I don’t think there’s a more versatile cooking vessel actually. I have a le creuset dutch oven, and I have used it for so many things, making bread, roasting bones, deep frying, poaching, that thing is amazing!
I too love my dutch oven! Not a le creuset, maybe one day!
I got mine for my birthday, keep having birthdays Jess, some wishes do come true! 🙂
Over time! I just got a Nikon D3200 for my bday a few days ago so I will start learning the world of DSLRs no! Yaaaay!
that’s so awesome! can’t wait to start seeing you DSLR work! congratulations!!!
😀 Thanks! I’m excited but I have noooo idea what I’m doing with it! Fun already though
the first thing to do: read the manual 🙂 like 5 times. hahahahah
You are very brave, Paul. When I saw Fae’s recipe, I thought it was out of my league in terms of precision and so I haven’t dared to try it yet. You have pulled off a very acceptable rendition, congratulations!
thanks Stefan! when I saw her recipe, I couldn’t resist but to try, naively I have to admit hahah, I almost gave up half way, this cake almost broke me!
Good for you…your cake turned out wonderful. I remember it from Fae’s post and was amazed how pretty is turned out.
🙂 thanks, I hope you are doing great, Karen! today and tomorrow I’m in Vancouver. This is a really pretty town!
Seriously I can’t believe you made this!!! Amazing!!!!!!!!
its super fun, all your little nephews and nieces would love it!
Such a striking cake, Paul, and how precise was the method. You did an excellent job on a cake tht is far beyond my own capabilities. Well done, Paul.
Thank you John! you couldn’t go wrong following Fae’s instructions, I wouldn’t have tried it otherwise!
Wow its so beautiful, I must try to make this!!!
🙂 thanks Sofia, I had no idea about any of this psychedelic cake business until I saw Fae’s post. I think you had too been talking about marble cakes recently, and I was like … I have to try this, seems fun. It was work though, I would only make a zebra cake for a special occasion! 🙂
Hello just wanted to give you a brief heads up and let you know a few of the pictures aren’t loading
correctly. I’m not sure why but I think its a linking issue.
I’ve tried it in two different browsers and both show the same results.
wow, thanks for catching that! the pics didn’t open for me until I clicked on one and then returned to the post page. So weird, I will take a look and hopefully be able to fix, thank you again!
so weird, it is working fine from my work computer… don’t tell anyone I’m blogging 😉
As I said in the other post, here goes, I’m going to make a version of this now! 🙂
Phew, done and in the oven. In the end I made it proper zebra style, 2 tablespoon by 2 tablespoon. Unfortunately I used these tablespoons my mum got me from Zara, sort of designer in looking but I strongly reckon that they actually have less volume than a real tablespoon.. so it’s taken forever! But in the oven now. Nervous to see how it will turn out.
hahhah, im sorry, even with proper spoons this cake is a test of anyone’s patience. How did it turn out????
this is awesome! thanks for the mention Fae!
Paul, Please feel free to go to the post and respond to the people who leave comments. By touching each comment with your mouse, ‘Reply’ pops out.
Please discard this comment once you’ve seen it. 😀
I will! and I won’t discard this comment! 🙂 thanks Fae!