
Dry-cured pork loin is one of those fun projects but chances are you don’t have a cellar/basement or a curing chamber and neither do I so please don’t get discouraged and read on. I dry-cure pretty much everything in my closet. Dry-curing isn’t but the simple process of removing moisture from meat by letting it hang in the open for an extended period of time until it reaches a certain weight while avoiding spoilage (in most cases the meat has been heavily salted which speeds up dehydration and inhibits pathogen activity).
Once it hits that target weight it is considered dried-cured. The reduced water content and the high salinity will keep the meat preserved (pretty much forever). The ideal temperatures and humidity range to achieve this can be found pretty much in every recipe out there but not everybody lives in the ideal weather or have the equipment to reproduce it. I’m sure you have a fridge at home though. Not that this is essential but it makes the process even easier. Do you have a vacuum sealer? Now that’s just cheating. guys!

Ingredients.
1 pork loin. Weight might vary so I will give you ingredients in % of the meat’s weight.
3% kosher salt.
0.25% Cure salt #2.
1% paprika powder (optional)
1% ground black pepper (optional)
The wet cure.
Weigh the meat and make sure to write down that number and keep that information handy (I write it on a piece of paper and stick it on the baggie). Mix all the dry ingredients well and place them in a plastic baggie big enough to hold the pork loin. Place the pork loin in the baggie and using your hand, rub the meat trying to distribute the cure evenly the best you can. Vacuum seal and place the baggie in the fridge for about a week per inch of thickness (a pork belly is from 1 to 2 inches thick, so that’s about a week or two for example), turning the baggie over, once a day, every day. The salt will draw water out of the meat, mixing with the rest of the dry ingredients creating a wet cure/brine. If you don’t have a vacuum sealer, use a ziplock bag and make sure to remove as much air as possible from the bag. This loin was about 3 and a half inches thick so I let it wet-cure for about 3 weeks.

Dry-curing. The Fridge phase.
Remove the meat from the bag and rinse it under cold water really well and pat it dry with paper towels. Place the meat on a cooling rack and then place the cooling rack over a baking sheet and place this contraption in the fridge for a couple of weeks (if you have enough vertical room in your fridge you could also hang the meat there. Otherwise you might need to tie up the loin as shown in the pics to keep its shape). Turn the meat over every day. This will reduce the moisture on the surface of the meat dramatically and make it less prone to spoiling during the final drying phase in your closet of choice.
Dry-curing. The Closet phase.
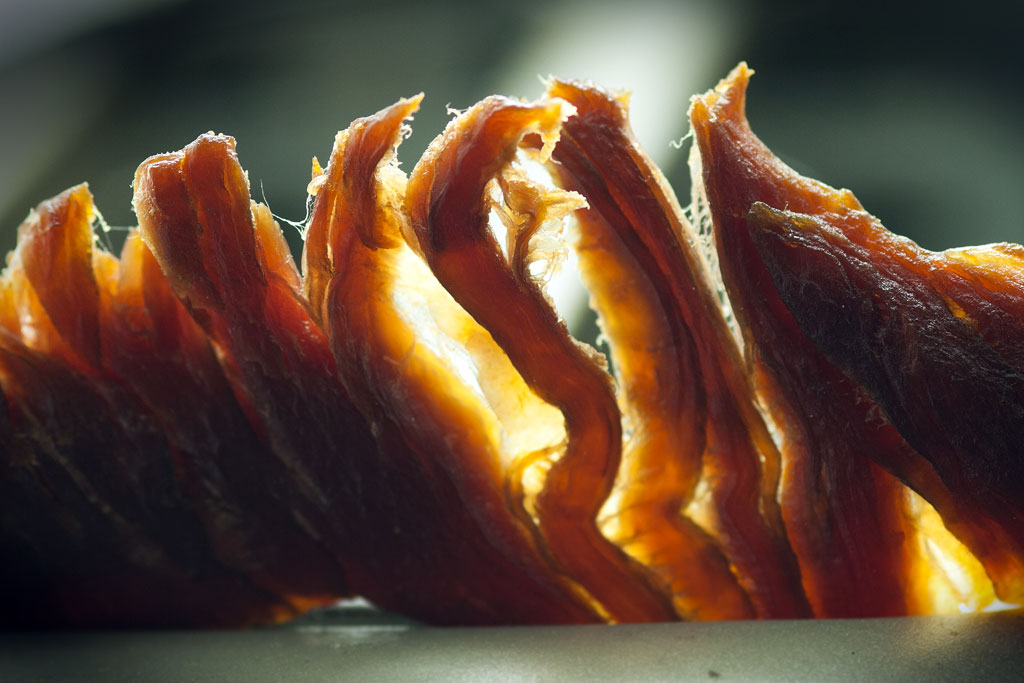
Using kitchen twine, make a butcher’s knot (slip-knot) and literally hang the meat in your closet. This phase isn’t time-based because you have to work with the humidity of your local climate/weather. Now you need a scale. Once or twice a week weigh the meat. Your target weight should be somewhere around 66% of the original weight which if you have been following the steps, should have been written down on a piece of paper and kept near the meat (I stick it to the hanging string). As the meat dries it acquires a wonderful dark reddish tone. It should also smell appetizing. The meat will continue to dry beyond the 66% mark which is normal but at the 66% mark, the texture and flavor of the cured pork is at its best so definitely give it a try!

How to deal with mold.
Keep an eye on the meat daily. To reduce the risk of mold growth (white or green), try rubbing the meat with distilled white or apple cider vinegar (any sharp vinegar really). If mold persists, rub it again. I doubt you’ll deal with a recurring-mold issue though. If you see any other mold types that aren’t green or white… probably best to abort your mission especially if you find black mold. I have never had to deal with this and I’m sure you won’t either.
Curing salts.
I’d like to talk a bit about curing salts. If you aren’t familiar, there’s a ton of information online. Sodium nitrite and sodium nitrate are what are used in modern times to cure meats at home and in the food industry (potassium nitrite used to be used in the old days instead…) Curing salts that you need to become familiar with are curing salt #1 and curing salt #2. They have other names like Prague powder #1 and #2 and also pink salt #1 and #2. It’s a bit confusing at first but not really. The number is what’s important because depending on the number, the composition of the curing salt is different and so is its application. Using one over the other would be determined by the length of the curing time required. #1 is used for quick cures lasting less than 2 weeks. #2 is used for anything above 2 weeks.
Why use curing salts?
Primarily to inhibit the growth of bacteria, especially the one responsible for botulism. You can cure meat without using curing salts (just by using regular salt alone) but better safe than sorry. Curing salts also have an effect on the color of the cured product. You know that beautiful pink color of ham, right? And they also affect/enhance the flavor of the meat. Make sure you label these salts clearly and keep them out of the reach of children. Don’t use them for any other culinary purpose. Only for curing.
Ready to start dry curing at home?
I know the idea might seem a bit daunting at first but it really is easy and safe. Just make sure you’re working with fresh ingredients. Meat shouldn’t smell of anything. If you detect funny smells, probably best to not use the meat altogether. Follow basic sanitation rules, wash your hands and any utensils you’ll be using and happy home-curing! Please, let me know if you have any questions or suggestions in the comments section below!

Wanna get more sous-vide cooking guides and cool cooking how-to’s in your mailbox? You know what needs to be done!
We never spam. You should only be getting updates when new content is posted on the site. We also respect your privacy. We don’t share your email address with anyone and you can unsubscribe anytime!
23 comments
I love this!!!!
hahah thanks Lotis!!!
Think I’ll try this, great photos as always!
thank you! Let me know how it goes!
Impressive. Can’t do it in Oklahoma, because of too high humidity, unfortunately. But boy does that look incredible.
are you sure? what’s the humidity? btw, you could just fridge-dry it
Well it varies. We use de-humidifiers, but I’m constantly fighting with the humidity.
I still think you should give it a try. If anything, hang the pork loin in an area that gets air ventilation. Ideal humidity for dry curing is around 60% which is pretty high actually.
I use my small wine fridge for all my curing/drying projects. Currently there’s a nice “lomo” in there. Also a pork loin with a nice layer of fat on it.
Yeah, been thinking about getting a used one. What brand/model is yours?
It’s a Kenmore. not sure what specific model though. One of those about 3 feet tall and fits maybe 40 wine bottles. I basically removed some of the racks in the bottom to hang whatever it is I am drying and still use the top racks for wine.
that’s exactly what I want to do 🙂 thanks for the info. Good to know that a 40 bottle one would work!
I don’t have Curing Salt #2 on hand, but I do have Tenderquick, which contains both Sodium nitrate and Sodium nitrite, albeit at a lower concentration than Specifically, both of these compounds are present at 0.5% levels each, with the balance of the contents being salt, sugar, and Propylene glycol. The directions say that one should use 1 Tablespoon or 1/2 ounce of this product per pound of meat.
Do you think I am going to have a successful (and safe) cure using this product in place of the Curing Salt #2 and Kosher Salt in your recipe?
Thanks!
Hey Steve, thanks for reaching out. I have never used Tenderquick but I’ve heard of it. In dry-curing, the most important thing to consider is the salt concentration, and as long as you know how much salt Tenderquick contains (concentration %) then you could, with some math determine if the 0.5% nitrite and 0.5% nitrate can be lowered to 0.25% (half… and even this is dodgy math) if you’re using the amount of tender quick needed to get to a 3% salinity… sounds complicated and I’m not doing a good job at explaining this well. Say you are curing 100g of pork. You will need 3g of salt and 0.25g of cure salt #2 (and I don’t know what’s the concentration of nitrate and nitrite in there, because this curing salt is like 50% sodium more or less). As you can see… gets complicated rather quickly.
My recommendation is to not experiment with tender quick for long cures like this recipe and maybe just go with salt… many people do it this way (especially nowadays, when pork meat is a lot safer). I just wouldn’t wanna see you try tender quick and end up with a curing mix that is too high in nitrites and nitrates… it’s probably not healthy.
The common dosage of TenderQuik is 1 Tablespoon per pound, and the same duration of cure stated.
For example, I by packaged tenderloins which are nominally 2-3 pounds each and measure roughly 2″x3″x12″ long. I’ll cure a rinsed and dried tenderloin with 1 Tablespoon TenderQuik + 2 Tablespoons Brown sugar per pound, well mixed and well rubbed into the meat, with any excess dumped in the ziplock bag. after 12-14 days curing in the refrigerator, they’re removed, rinsed, towel dried, and returned open to the refrigerator for 48 hours.
Then they’re rolled in course black pepper and Pecan smoked to 160* in a 180-200 degree smoker.
Pork shoulder is treated the same way, being cut to the same approximate dimensions.
They WILL buckle your knees and cross your eyes!!
I am anxious to try the dry hung recipe.
hahaha, that does sounds amazing! Why do you return them to the fridge for 48 hours? Dry the surface?
It makes a pellicle which is great when you plan to smoke it after.
Hi, i cured a pork loin and it seema to have worked but i notice that after a couple of months it gets super hard, like a rock. is it still ok?
the drying process never stops if the meat is exposed to air or stored in the refrigerator. I’d suggest keeping it in a ziplock back, squeeze out as much air as possible then store it wherever you want. Vacuum seal it for even better results! Hope this helps!
I am drying a pork loin. It was 4 pounds. I cut it in half, added salt and pink salt #2, black pepper, fennel seeds, paprika and ground red pepper. I placed them in UMAI bags and vacuum sealed them. The drying is done in the refrigerator. After i.5 months, they have lost about 16% of weight and look good. When they lose 40 %, I will start slicing one, and place the other in a regular vacuum sealed bag to freeze. UMAI bags in the fridge are the way to go regardless of where you live.
I have never tried it but always wanted to age beef using them. Your seasoning sounds delicious! thanks for the suggestion!!!
How do we measure the humidity that we plan on storing our meat?