
Japanese chiles are similar to Arbol chiles but milder. I figured they would make a great hot sauce to have around (a little milder compared to what I usually have in stock) and I took the opportunity to introduce a new step (more like a variation of a step) in the process that would help make the straining of the sauce easier and yield a silky texture by using a juicer. Yeah, one of those bulky 20-pound things that sit on the counter taking much-needed space and are used like twice to make… carrot juice or something lame like that. A proud “unitasker” in the words of Alton Brown. They never go back in the box. Instead, they become super helpful in the efforts of collecting dust and being simply annoying. But in the quest for a silky smooth hot sauce, this thing can actually be pretty helpful.

If you aren’t familiar with the process of fermentation (especially in the context of hot sauces) I have written a bunch about it so feel free to first check out some of these articles below which are a good source of information especially if you’re just getting started with this technique and want some confirmation that what you’re doing is nothing crazy :
How to ferment hot sauces at home. the easiest way
Most delicious fermented tomatillo hot sauce.
Amazing fermented habanero hot sauce.
Ingredients (makes about 1000g):
100g dried Japanese peppers
1 medium onion. diced.
8 garlic cloves. Smashed.
200g tomato sauce
10 sprigs of parsley
10 sprigs of cilantro
Enough water to cover the ingredients.
Enough salt to end up at a 3% concentration by weight of the whole sauce.
1/2 tsp Xanthan gum roughly. (Add this in the thickening step)
Stuff that jar.
You’re gonna need a scale for this step and make sure the measuring unit is set to grams (why would there be any other options on a measuring scale??). Find a vessel that you like and weigh it. A tall jar with a lid. A crock works too. I’m using these really cool plastic juice jugs this time. Anyways, yes, weigh the container plus the lid and write down that number. Stuff the jar with all the ingredients. I’d start with the dry chiles because they like to float and to optimize fermentation we need everything underwater. So, stuff the peppers first, then the rest of the ingredients and finish with the onion. I love that finish.

Fill it with water.
Now pour in water (I use tap water but feel free to use bottled water if that makes you feel better) until everything is submerged just barely. Weigh the container plus the lid again and take down that number too. Subtract those 2 numbers. Then… 3 times that number divided by 100. That’s gonna give you the amount of salt needed in grams. Three percent. Add that salt amount to the jar, close the lid shake or stir until the salt has dissolved.
Keeping things submerged.
I referenced Alton Brown above… and I need to do it again. The ziplock bag trick… I have no idea who came up with this (wouldn’t be surprised Alton did) but I saw it in an episode of Good Eats on pickles. Alton has been a superhero of mine for a very long time. This little trick literally changed my life. I had no idea how difficult keeping veggies underwater could be when I got into fermentation. I tried every method suggested in books/online and nothing ever worked as well as this. Get a ziplock bag, and fill it halfway with water. Place it on top of your veggies. Some adjusting might be necessary (how much water to add, size of the bag itself) but it’s definitely not rocket science. And that’s it. As long as your ziplock bag is big enough to cover the diameter of your fermentation vessel (or just close enough) you should be good to go.

The speed of fermentation.
Fermentation is a natural process and the speed is determined by the activity of the bacteria/yeasts responsible for it. Three important factors are temperature, salinity, and acidity. During warmer months, fermentation accelerates and I’ve found some jars to reach a Ph below 4 (that’s about vinegar acidity) in less than a week. In colder weather, it might take 2 to 3 weeks to achieve that same Ph. The higher the salt concentration in the jar, the slower things will progress. I’ve long settled for 3% salinity after many tests and I found that going with lower salinity has an undesirable effect on the taste/texture of the resulting ferment. At 3%, fermentation seems to move at a decent pace and in my opinion the taste is optimal. Acidity just like salinity slows down the fermentation process. Lactobacilli produce lactic acid and the acidity of the ferment will go up over time until it peaks at around a ph of 4 more or less. Ironically lactic acid production will slow down the bacteria’s ability to reproduce. If you’re are adding other sources of acid like lemon juice or vinegar, for example, keep in mind that fermentation will take a longer and in some cases, it might not allow any noticeable bacterial reproduction. So, how long does fermentation take? I would suggest smelling the jar(s) once a week until they produce that awesome funky cheesy characteristic aroma.

Kickstart things up.
I rarely ferment from scratch. By that I mean, I don’t let the environmental bacteria do all the work. I’m not patient enough for that. Since I’ve been fermenting for a few years now I have always kept something bubbling away in some jar somewhere. I keep a jar of fermenting garlic which I feed regularly (same idea, 3% saline solution and garlic) and these garlic cloves I use in most of my recipes. I like to use some of the juice as well. Whenever I can I collect fermentation-brine surplus from fermentation projects and keep it in bottles in the fridge making sure to feed them a stalk of celery from time to time to keep things interesting. This lactic acid brine is amazing and I use it for cooking and salad dressings. Anything that calls for acidity and a hint of awesome funkiness.
Bring out that juicer.
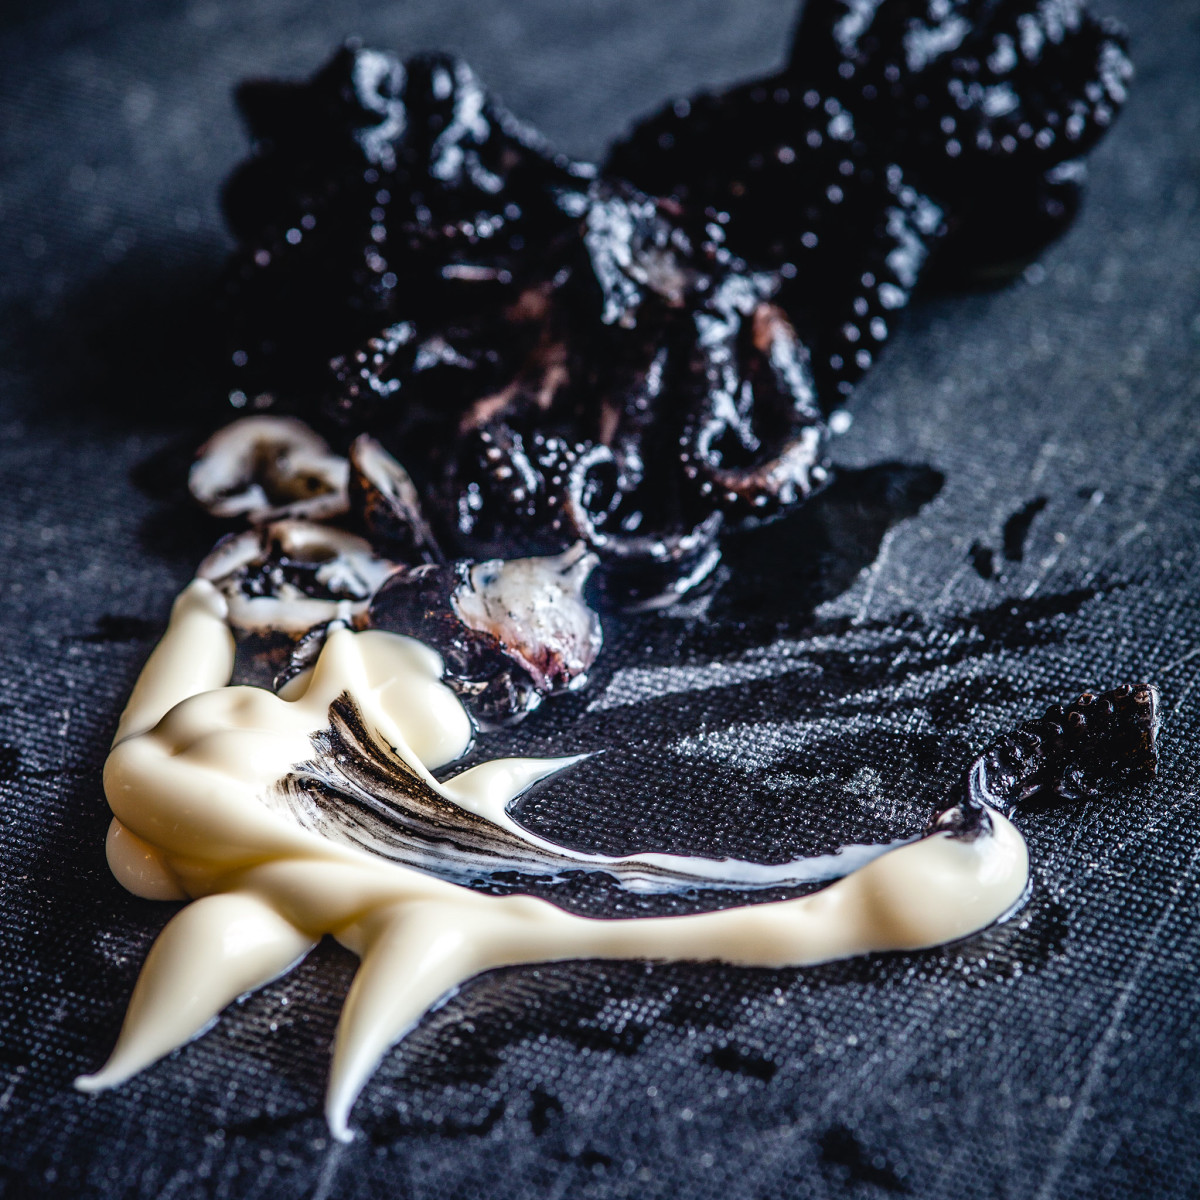
Alright, so we’re ready. The smell test came back positive with that classic funky awesomeness. It is time to juice it up. There’s seriously nothing to this step. The only thing I would like to say is that it can get messy. It WILL get messy actually so keep that in mind going in. Some people like to use gloves to deal with hot peppers I don’t but if you have sensitive skin might as well. Add the content of your jar in batches to the juicer. The seeds from the dried peppers are stubborn and they don’t like going in against a high-speed spinning strainer with sharp grates. Them seeds will bounce around like crazy. Keep the juicer mouth covered and operate in the low setting. I juiced the collected pulp about 5 times to fully extract all the liquid out of it. After the fifth time, I was getting only a few extra drops so I stopped. It was a lot of fun I have to say until it was time to clean up.

Thicken it up.
Now, since most of the solid stuff is left behind the juice itself is very runny and not that interesting at this point but it tastes amazing. It can surely be used as is but for that elegant finish, we need to thicken it up. This is where Xanthan gum comes into play. It doesn’t need to be heated which is great. It also has an incredible thickening power so you’ll just need a very small amount. I use a blender for this step and I only add maybe half the juice in the blender cup (My blender is kinda small but if you have a bigger blender, you should process all the juice at once). Begin with a quarter of tbs and blend until you notice the juice has thickened up. Be careful not to over-thicken it. The mouthfeel can go from wonderful to yucky very quickly. If you own a microscale go in 0.01% increments of the total juice weight until you reach the desired consistency.
Storing it.
I keep all my fermented goodies in a cabinet at room temperature and away from the sun. The whole point of fermentation is to preserve food so why keep it in the fridge. Every now and then though I do enjoy cold ferments so I’ll store some in the fridge. It’s a temperature thing, like eating cold pickles instead of room-temperature ones for example… they’re the same pickle but for whatever reason, being cold makes them well… extra yummy. As far as shelf-life goes I can’t say that I can suggest a time limit for keeping fermented food in storage. Some sources suggest a few months. I’ve had fermented goodies last over a year until running out and aging away only made them taste better. So keep them around until they’re gone or perhaps they start to smell a little off (I can’t think of one case). There’s the issue of mold that sometimes develops. I don’t mind white molds. I either remove it or eat it (sometimes it’s actually yeast which makes the ferment taste extra cheesy… yeah, 2 thumbs up). Other mold colors I’m more careful about. If you see black mold ANYWHERE don’t think about it and toss that ferment away but that’s rare. I’ve never seen black mold in one of my jars to this day.

On to your next kitchen project. Goodbye.
Wanna get more sous-vide cooking guides and cool cooking how-to’s in your mailbox? You know what needs to be done!
We never spam. You should only be getting updates when new content is posted on the site. We also respect your privacy. We don’t share your email address with anyone and you can unsubscribe anytime!

2 comments
I’m impressed! Wish I could taste it!
haha thanks Mimi! super easy to make.