
It’s been a while since my last fermentation post on this blog but make no mistake, this house is full of LAB (lactic acid fermentation bacteria, the good guys) and stuff here ferments 24/7 … multiple projects going all at the same time… It’s a bit intense sometimes. I’m getting into fruit Lacto-fermentation now and Noma is to blame. Their book on fermentation is amazing and simple…. like any fermentation literature for the home chef should be. Leave the complicated stuff to microbiologists and embrace the fun of letting stuff go bad in a good way… (minimal OCD required, I promise).

A little history.
Ok, kimchi! One of my favorite ferments ever. I love store-bought and restaurant kimchi which I’m sure is store-bought most of the time. I have made it a few times at home but I think I finally hit the sweet spot… and it happens to be the one time I make it without measuring anything of course (flying by instruments doesn’t help for blogging recipes). I’ve been fermenting foods for a long time and quite frankly all the measuring kind of gets in the way of the fun. Sure, if you’re looking for that ability to reproduce the same thing over and over, measuring is key but what measuring also does is lowering the chances of a happy accident as well as your ability to develop that cooking intuition. I can’t believe I’m saying this… I’m all about measuring shit and being all OCD but lacto-fermentation, once you’ve gained some experience is simple enough that free-styling it is probably a better way… or at least more fun.

What container to use for fermentation.
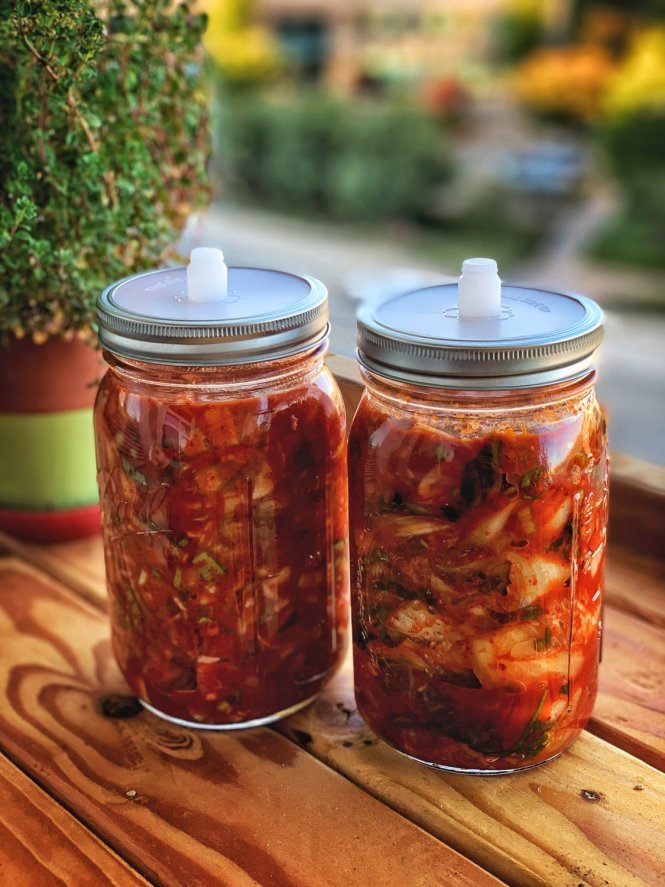
I use ball jars for many of my fermentation projects (as well as big glass crocks, ceramic crocks, whiskey bottles, plastic water jugs, whatever BPA free thing I can find, etc, etc)… but what about the lids? … over the years I’ve gone from the default canning lids which rust (no good for fermentation) to plastic ones (which are great)… to no lids (using balloons… yes… balloons wrapped around the mouth of jars and stuff), to finally a more sophisticated solution provided by one of my blog supporters: Ibrahim Dahlstrom-Hakki and his hassle-free fermentation lids which you can get at Amazon. I hope these silicon lids last me forever. I really like them.
The basics.
To make kimchi you’re gonna need a few things and I will list them here in a bit but allow me to say that the must-have ingredients are only a few: napa cabbage (I’ve tried other kinds and it works but … nothing beats this guy), garlic (no garlic no kimchi), salt (obviously), and Korean chili powder (I’ve tried so many other hot chilies and sure, the results are good but if you want the traditional Korean flavor, you gotta go with this). Ok… green onions… I don’t want to leave them out because kimchi’s flavor profile sort of hinges on them… so let’s add them to the list. Now glutinous rice might be the ring to rule them all sort of speak. I’ve been making kimchi without rice from the beginning and there was always something missing, not just in the taste but also in the texture. If you’re serious about kimchi, get some rice flour.

A few more things before we begin.
One of the most interesting things about kimchi is the water extraction portion of the preparation. Unlike most ferments I make at home, in which the water in the vegetables is kept in the jar well… when making kimchi we want to actually remove that water. The cabbage is salted and then rinsed a few times until it has softened and lost a lot of water weight. Kimchi is a drier ferment so keep that in mind. That’s the key to its texture, it’s not soupy or watery… in fact, it is almost creamy. We will talk about the addition of cooked rice flour in a bit (which contributes to that creaminess) but the main reason behind kimchi’s awesome texture is the water extraction aspect, but let’s list the ingredients and dive into it.
Ingredients (use as a guideline but feel free to change it to your taste):
1 Nappa Cabbage head (separate all the leaves)
20 green onions. chopped.
1 or 2 garlic heads. Pureed. (Perhaps 3 or 4? I like lots of garlic in mine)
1 Onion. Pureed.
1-2 carrots. Either shredded or fine julienne.
1/2 Korean radish. Fine julienne.
2 tsp fish sauce
1 Tbsp Salted shrimp (the tiny little guys…. optional of course but I love ’em)
1-2 tsp minced fresh ginger (or pureed)
2-6 Tbsp Korean chili powder. (I like red vibrant and spicy kimchi, sue me)
1 tsp MSG (get over it)
1/2 Cup of kosher salt. (you might need a bit more to tune up the seasoning)
For the rice porridge:
1 Cup of water.
1 Tbsp sweet rice flour. (I use Mochiko flour)
1 Tbsp Sugar (turbinado if you have it)
Rice porridge.
Ok, so this is an interesting part of the process of making kimchi. It is unusual but without this, kimchi wouldn’t be the kimchi I love. Kimchi juices aren’t soupy. They have body and that’s because of the rice starch. Kimchi juices coat the cabbage really well and the mouthfeel is amazing. To make the rice porridge just mix the rice flour into cold water, also add the sugar and stir until dissolved, bring to a boil for a few seconds and remove the pot from the stove. Let it cool down to room temperature. This will be the base of the paste. More on this in a little bit.
The salting phase.
As in most preservation examples, salt is the key. I’ve been fermenting stuff for years and in most cases, I can stipulate the amount of salt needed. Most of my lacto ferments are based on a 3% salt concentration. That’s for every 1 part of veggies+water I add 0.03 parts of salt. I do this mainly for 2 reasons: First and foremost, because salt prevents bad bacteria from growing, and second because 3% is the lowest you can go and still get an excellent ferment… that is flavor and texture-wise. Now with kimchi… I find it really hard if not impossible to calculate the amount of salt needed because of the way the process works. Unlike sauerkraut in which you let the cabbage ferment in its own juices, kimchi requires you to dispose of its water as you salt the cabbage. Like I mentioned before, kimchi is a drier type of ferment.

How to salt this thing.
This is how it goes. Separate all the leaves beforehand and ready up a wide container that can hold your cabbage (I bought a plastic wide punch-bowl the other day… best 2 dollars I ever spent at a Korean store. Get your salt and start sprinkling salt all over the leaves generously. Don’t use all your salt. We will be salting a few more times until the cabbage is ready. After the first sprinkling let the cabbage rest for a good 30 minutes. Water will start to collect at the bottom of the container. Massage the cabbage a bit and sprinkle more salt. Get in there… this is your opportunity to show this vegetable who’s boss. As the salt work on the cabbage more and more water will start to collect as this thing softens and becomes more and more pliable. After 2 hours more or less the cabbage should be soft enough to squeeze with your hands. At this point, you can toss that salty water and taste your creation. Season with salt. Kimchi is a ferment and needs to be salty… if you don’t know how salty… imagine ocean water.
But what’s the point of using all this salt?
The point is flavor concentration. Extracting as much water as possible before the fermentation phase makes kimchi awesome so pay attention to the salting step closely and don’t rush it. It takes time. Like I said… about 2 hours total for the salt to transform this brittle cabbage into soft and gorgeous kimchi cabbage.
What do I do with the radish?
Exactly the same thing. Salting and water extraction in a separate vessel… although having the radish and cabbage together should work too. Up to you. I like working them separately because they tend to soften at different rates. Radish will go quickly because it has been sliced thinly (more surface area gets exposed to salt).

The paste.
I believe traditionally this is done for organizational purposes but I don’t think there’s any other reason. The paste consists of pureeing the onion, garlic, and ginger and mixing it with the rice porridge, the sugar and really the rest of the ingredients. I use my blender to puree the stuff but a food processor should do or even a fine mince if you have the knife skills. This paste is to be folded into the softened cabbage (don’t forget to add the radish too!). I basically pour this thing into the container with the cabbage and the radish and massage the hell out of it until it looks like kimchi. Trust me, you will know when that is.
That red spicy stuff.
If you’re looking for that amazing true Korean flavor you gotta use the right spice. Gochugaru (chili powder… the Korean kind) is sold in Asian markets or you can get it online. The beautiful color of kimchi comes from this chili. It is very vibrant red but mild in terms of heat so don’t be shy when using this stuff. The color requires some work to bring out. It doesn’t come out easily thus massaging being necessary if you want your kimchi looking amazing from day one.
The fermentation phase.
Here’s where your work stops and it is lacto bacteria’s turn to shine. Transfer your fresh kimchi to whatever vessel you intend to use leaving some room for gas expansion. I like to give at least an inch and a half of headroom. Press down on the kimchi with a wooden spoon whatever you can find. It should be compact with little if any air and the solids covered by its kimchi juice. Place the vessels in a cabinet or someplace away from direct sunlight unless you’re using an opaque container such as a ceramic crock. You’re days away from something amazing.
The aging phase.
Fermentation is a slow process in which the forces of nature work together to make yummy stuff. The temperature of your house plays an important role in the speed of fermentation. Warmer means quicker but not necessarily better. Between 60F and 70F ..ish should be ideal during the first few days. Some people like unfermented kimchi which is fine but I prefer the funk that comes with a week of fermentation and the souring that takes place. The Ph drops to about 4 and that’s about the sweet spot for me. After this, I transfer my kimchi to the fridge where it will remain until it’s all gone. Now, fermentation won’t stop in the fridge and the flavor improves as it slowly ages. There’s seriously no rush in eating this thing. In fact, I like my kimchi better after 3-6 weeks of fridge aging time.
Let’s wrap it up.
As usual… I fail to provide a simple how-to on kimchi making but I hope to have shared some useful information about the process the way I understand it. There are so many kimchi variants out there it can be a bit confusing if not overwhelming to get your own kimchi project going. I suggest finding the common denominators and going for it. If you have any suggestions on how to improve this post or have any questions, leave them down below. C yah.
Wanna get more sous-vide cooking guides and cool cooking how-to’s in your mailbox? You know what needs to be done!
We never spam. You should only be getting updates when new content is posted on the site. We also respect your privacy. We don’t share your email address with anyone and you can unsubscribe anytime!
5 comments
Good stuff Paul! I’m missing you on Instagram 🙂
I’m coming back! just needed IG detox!
thanks Jacqui!
This was great. I’ve made kimchi once. I did follow a recipe. Although I probably didn’t cause you’d have to put a gun to my head to actually follow any recipe to a t. Anyway, this is fascinating stuff. I made pancakes with my kimchi – on the blog – and they were so good I ate all of them. (Husband won’t get near anything pickled or lacto fermented.) Good to see your presence again.
hahaha! i can’t follow recipes to save my life either! I’ve made kimchi fried rice, and kimchi stir fries but no pancakes yet although they do look amazing! Great to hear from you, Mimi!